Michigan Home Staging Secrets That Actually Sell
Most sellers have heard the standard staging advice — declutter, depersonalize, clean the counters. And while those basics are essential, they're just the starting point. After more than 20 years in the real estate industry — including deep experience in marketing and graphic design — I've learned that the homes that sell fastest and for the highest price go beyond clean and neutral. They create an emotional experience that makes buyers feel something the moment they walk through the door. If you're just starting to think about selling, read our guide on preparing your home for sale from a Mid-Michigan perspective and why professional photography matters. Here are the advanced staging secrets I share with my seller clients to make their homes irresistible to buyers — especially through the lens of a camera.
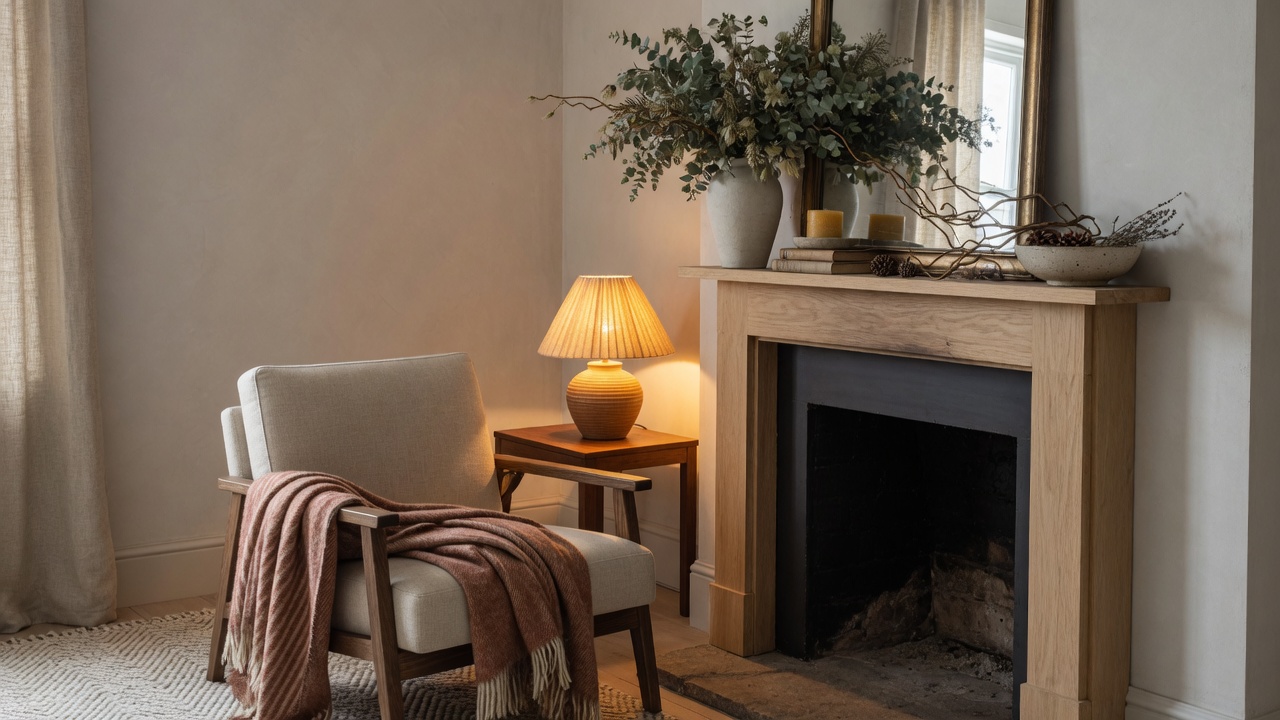
Focal Point Creation: Give Every Room a Purpose
The biggest mistake I see in staged homes is rooms that feel generic — nicely decorated but without a clear identity. Every room should have a defined focal point that draws the eye and gives the space a sense of purpose. This is what transforms a room from "looks nice" to "I can picture myself living here."
Here's how to create focal points that work:
- Living room: Anchor the room around a single feature — a fireplace, a large window with a view, or a striking piece of art. Arrange furniture to face or frame that element. If you don't have a natural focal point, create one with a large mirror above a console table or a statement light fixture that draws the eye upward.
- Primary bedroom: The bed is your focal point, always. Invest in a headboard if you don't have one — it doesn't need to be expensive. A simple upholstered headboard in a neutral fabric instantly elevates the room. Layer the bed with a clean duvet, two to four pillows in coordinating tones, and a textured throw folded at the foot. Make it look like a hotel bed.
- Kitchen: Clear the counters completely, then create one intentional vignette — a wooden cutting board with a small bowl of green apples, or a cookbook on a stand beside a ceramic crock of wooden spoons. The goal is to suggest a lifestyle without creating clutter.
- Dining room: Set the table. Not with your everyday dishes — use simple, clean place settings with a neutral tablecloth or runner. Add a centerpiece that's low enough to see across (candles, a small arrangement of greenery, or a tray with decorative objects). A set table signals "this is where you'll host Thanksgiving dinner."
The principle is simple: when a buyer walks into a room, they should immediately understand what the room is for and feel drawn into the scene you've created.
Lighting Layers: Creating Warmth and Depth
I covered basic lighting tricks in my budget staging guide, but advanced lighting goes beyond turning on every bulb. The goal is to create layered lighting — ambient, task, and accent — that gives rooms depth, warmth, and visual interest.
Here's how to layer lighting like a professional stager:
- Ambient (overhead) lighting is your baseline — ceiling fixtures, recessed lights, and chandeliers that illuminate the whole room. Make sure these are on during showings, but they shouldn't be your only source of light.
- Task lighting adds functional warmth. Table lamps on nightstands, a reading lamp beside an armchair, under-cabinet lighting in the kitchen — these create pockets of warm light that make spaces feel inviting. Place lamps where buyers' eyes naturally land when they enter a room.
- Accent lighting creates drama and depth. A small spotlight aimed at a piece of art, a candle grouping on a mantle, or a string of warm-toned LED lights along a bookshelf adds visual interest that photographs beautifully. The key is subtlety — accent lighting should enhance, not overpower.
- Bulb temperature matters. Every light in the house should be the same temperature — warm white, 2700K to 3000K. Mixing cool and warm bulbs in the same space creates visual discord. Walk through with fresh bulbs and make every fixture consistent.
- Dimmer switches are staging gold. If you don't have dimmers in your main living areas, installing them is a $20 to $40 investment per switch that transforms how a room feels. Lowering the lights slightly during an evening showing creates ambiance that overhead brightness can't match.
Texture Mixing: The Secret to Interiors That Photograph Beautifully
One thing I notice in professionally staged homes — and in the images that perform best online — is the deliberate use of mixed textures. A room with all smooth surfaces feels flat and cold. A room with a thoughtful mix of textures feels rich, layered, and inviting, even on a screen.
Here's how to layer textures effectively:
- Start with a neutral base. Your large pieces — sofa, area rug, curtains — should be in neutral tones. This gives you a canvas to build texture on.
- Add soft textures. Chunky knit throws, linen pillows, velvet cushions, and plush area rugs create tactile warmth. In fall and winter, heavier textures like wool and faux fur add seasonal coziness. In spring and summer, swap to lighter linen and cotton.
- Incorporate hard textures. A woven basket beside the sofa, a wooden tray on the coffee table, a ceramic vase on the mantle — these add visual weight and contrast against soft fabrics. Natural materials like wood, stone, and rattan work beautifully.
- Use metallic accents sparingly. A brass picture frame, a copper pot on the kitchen counter, or a gold-toned lamp base adds sophistication without overwhelming. One or two metallic touches per room is plenty.
- Play with scale. Mix large, bold textures (a big woven basket, a chunky throw) with smaller, finer ones (a silk pillow, a delicate candle holder). The contrast creates visual rhythm that makes rooms feel curated rather than catalog-ordered.
The goal is to create rooms that feel like they have a story — not rooms that look like they were staged from a single store display. This is where my background in marketing and graphic design comes in handy — I see homes the way a camera and a buyer's eye see them, and I help sellers create scenes that translate powerfully in photos and in person.
Scent Staging: The Invisible Selling Tool
Scent is the most underutilized staging element, and it's arguably the most powerful. Research consistently shows that scent influences emotion and perception more strongly than any other sense. A home that smells fresh, clean, and subtly inviting creates a positive first impression that lingers long after the showing is over.
Here's how to master scent staging:
- Start with clean. Before adding any scent, eliminate odors. Deep clean carpets, wash pet bedding, clean garbage disposal drains with ice and lemon, and launder curtains and throw blankets. If you smoke, smoke outside exclusively and consider having upholstery professionally cleaned. No amount of fragrance overpowers a persistent odor.
- Avoid synthetic air fresheners. Plug-ins, sprays, and scented candles with strong synthetic fragrances can trigger allergies, create headaches, and make buyers wonder what you're trying to cover up. Many buyers are scent-sensitive and view artificial fragrance as a red flag.
- Cook subtle, natural scents. Before a showing, simmer cinnamon sticks, vanilla extract, and orange peel on the stove for 15 minutes, then turn it off. The residual warmth carries a gentle, natural scent through the home. Fresh-baked cookies work too, but keep it subtle.
- Use natural diffusers. A reed diffuser with a light essential oil scent — vanilla, linen, or eucalyptus — placed in the entryway creates a welcoming first impression without being overpowering. Fresh herbs from the kitchen (rosemary, basil) in a small vase add greenery and scent simultaneously.
- Open windows when possible. Fresh air is the best scent. Before a showing, open windows for 15 to 20 minutes to ventilate, then close them and set the temperature comfortably. The slight freshness of outdoor air — especially in spring and fall — is more inviting than any product.
- Address musty basements. Michigan basements are prone to mustiness. A small dehumidifier running before showings, plus a discreet bowl of baking soda, can neutralize odors without adding fragrance.
Preparing for Professional Photography: The Pre-Shoot Checklist
Professional photography is the most important marketing tool for your listing — and the photos that perform best online come from homes that are staged specifically for the camera. Here's the pre-shoot checklist I give my sellers to make sure their home photographs at its absolute best:
- Remove all clutter from surfaces. Kitchen counters, bathroom vanities, nightstands, and coffee tables should have minimal, intentional items only. The camera sees everything — and clutter reads as "not enough space."
- Open every blind and curtain. Natural light is the single biggest factor in great real estate photos. Photographers use natural light wherever possible, and dark rooms are nearly impossible to photograph well. Open every window covering in the house.
- Turn on every light. Every overhead, lamp, under-cabinet, and closet light should be on. Even if the photographer doesn't use them all, the ambient warmth shows in the final images.
- Make every bed perfectly. Hospital corners, fluffed pillows, a throw folded at the foot. Bedrooms are some of the most-photographed rooms, and a messy bed ruins an otherwise beautiful shot.
- Clear the refrigerator. Remove every magnet, photo, and paper from the fridge. A clean, stainless-steel or white refrigerator surface photographs dramatically better than one covered in personal items.
- Hide all trash cans. Kitchen trash, bathroom trash, recycling bins — move them all out of sight. Even a tasteful trash can in a photo creates subconscious distraction.
- Close all toilet lids. This seems small, but it matters more than you think in bathroom photos.
- Remove pet items. Food bowls, litter boxes, pet beds, and toys should be completely out of sight and out of smell. Buyers need to imagine the space as theirs.
- Park cars in the garage. Vehicles in the driveway reduce the visual impact of your home's exterior. If you can park them on the street or in the garage, do it.
- Step outside during the shoot. Your photographer works best when the house is empty and they have freedom to move. Plan to be gone for one to two hours during the photo session.
The Marketing Connection: Why Staging and Photography Go Hand in Hand
As a REALTOR® with a background in marketing, I approach every listing as a marketing project — not just a for-sale sign. The staging work you do before listing directly determines how your home performs online, where more than 90% of buyers will see it first.
Here's the connection: staged homes photograph better. Better photos generate more clicks, more showings, and more offers. More offers drive higher sale prices. It's a chain reaction that starts with the staging decisions you make before the photographer arrives.
That's why I work closely with my seller clients on staging preparation — not just telling them to "declutter and clean," but walking through each room with specific, actionable recommendations. From the focal point in the living room to the texture mix in the primary bedroom to the scent in the entryway, every detail matters.
Staging for Different Buyer Profiles in Mid-Michigan
The way you stage your home should reflect the buyer most likely to purchase it. In Mid-Michigan, different communities attract different buyer profiles. A home in Grand Blanc or Fenton, for example, often appeals to families who value school districts, backyards, and open floor plans for daily living. Your staging should emphasize these features: show the backyard as a play space, stage the kitchen as a gathering hub, and present the bedrooms as quiet, functional retreats. In contrast, a home in a downtown-adjacent area like Clarkston or Lake Orion may attract professionals or downsizers who value walkability, low-maintenance living, and dedicated home office space. Stage those homes with a focus on flexible living areas, a well-defined office nook, and outdoor entertaining spaces like patios or decks.
Understanding who is most likely to walk through your door allows you to stage with intention rather than guesswork. I help my sellers identify their target buyer profile early in the preparation process so every staging decision, from furniture arrangement to color palette, speaks directly to the right audience. This targeted approach is one of the reasons my listings consistently attract strong showings and competitive offers.
For more staging guidance, check out my budget-friendly staging guide and my tips on why professional photos sell homes. You can also explore my complete seller strategy to see how I position homes for maximum impact.
Ready to Stage and Sell?
Every home has selling potential — it's just a matter of bringing it out. Whether you need help planning a full staging transformation or just want a second opinion on which rooms to prioritize, I'm here to help. Schedule a consultation or call me at 810-513-3335. Let's make your home the one buyers can't stop thinking about.

Keller Williams First · 810-513-3335 · Schedule a consultation